Blog

hyperhidrosis (sweaty palms) & HEnna

What is sweaty palms and how to help brides dealing with it ?

What is HYPEYHIDROSIS ?
Hyperhidrosis is excessive sweating usually affects palms, underarms, sole and face. Sweating also occurs, especially when you’re nervous. Primary hyperhidrosis is caused by faulty nerve signals that trigger eccrine sweat glands to become overactive. It can be some deficiency or some underlying disease or just anxiety.

How can it effect your henna application ?
A sweaty palm will be an issue for your henna as henna might smudge all over. Also henna might not stain well on the skin due to the sweat on the palms.

Tips for brides who have sweaty palms to apply henna.
Here are some tips for artist and brides to start their bridal henna when they have sweaty palms.

BEFORE HENNA

  • Wash hand frequently before applying henna (For cooling purposes).
  • Soak hand in warm water with camphor or baking soda (10 to 15 min daily) few days before your bridal henna appointment.
  • Keep yourself hydrated.
  • Keep calm and less nervous to reduce stress which may cause sweating more.
  • Check with your doctor on treatments if sweating is severe.

DURING HENNA

  • Use dryer or fan to dry the henna on palms. Stay in AC room.
  • Henna artist advised to go for thin designs. Thicker design take long to dry.
  • Keep your brides distracted and calm. Less stress, less sweating.
  • Use talcum powder, spread generous amount of talcum after doing henna.
  • Leave tissue on top of palms to absorb excess sweat once henna dried.
  • If palms still sweating excessively remove henna and do clove heating/fumes several times. Avoid water for as long as you can.
  • Apply some Vicks or henna balm after removing henna.
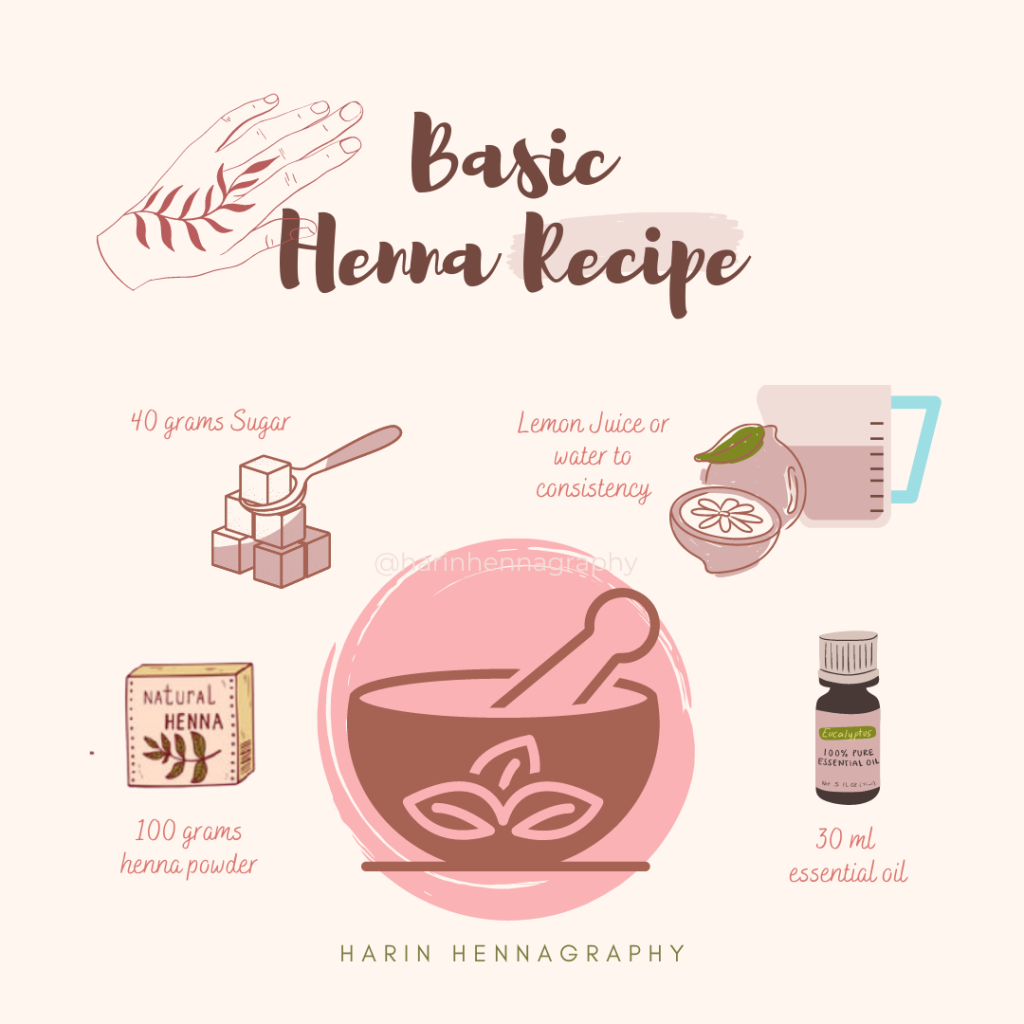
Infographics :
https://www.instagram.com/p/C1q3UGIR02J/?utm_source=ig_web_copy_link&igsh=MzRlODBiNWFlZA==

Henna MIxology- basic henna recipe

copyright reserved @harinhennagraphy

Mixing your own henna paste is very easy and it only requires 4 basic ingredients to get start with. Refer to my previous blog on why we use these ingredients.

What you need ?

  • Bowl (Glass bowl preferred as plastic & steel bowl may give reaction from the Essential oil and Lemon)
  • Spatula (For bigger batches you may use a hand mixer to aid in mixing.)
  • Cling wrap
  • 100 Grams Henna Powder
  • 40 Gram Sugar
  • 30ml Essential oil
  • Lemon Juice/Water to consistency

How to mix your henna paste.

  1. In a bowl add the dry ingredients (henna powder and sugar) and mix well
  2. Then add in the essential oil and water to consistency.
  3. Mix the ingredients until it form a thick (mash potato) paste.
  4. Cover the bowl with lid or cling wrap.
  5. Leave it for dye release for 4 hours or more (lemon juice longer time- best overnight)
  6. Mix it to dissolve all lumps and add more liquid if needed to desired consistency. Paste is ready.

Note – to know if your henna is ready simple scoop the layer on top and see the difference in colour. You may also place a tissue on the cling wrap with a heavier object on top and see how the tissue turns orange when the dye release.


Quantity of sugar I use varies on the humidity 30grams to 40grams. To get a good stain the ratio of henna powder and sugar have to be right. The use of right powder and essential oil also contributes. In colder places its advised to keep the henna paste longer for dye release.

Often people think its hard to mix your own natural henna paste, henna takes lots of time to release dye and its a hassle. This will then lead them to getting store brought cones (shelf stored cones) which is never 100% natural and contains chemical to preserve the shelf life. Natural henna needs to be stored in freezer when not used unlike chemical filled cones.

Storing Henna Paste

  • Refrigerate immediately and use within a week for best stain results.
  • Freeze henna for up to 3 months.
  • Continuous thawing and re-freezing of cones will diminish the quality of henna. Therefore is best to not refreeze again your henna cones.

Why get the store or factory made cones filled with chemicals when you can actually mix it yourself and be sure 100% of the ingredients used. As time goes by you will learn how to master your own henna paste with the right consistency. Practice!

ALWAYS CHOOSE THE RIGHT CHOICE !

Henna Ingredients – What you need to make your own henna paste.

To mix henna paste all you need is pure ingredients that are safe and natural. Ingredients used in mixing henna are as follows:

  • 100 grams Henna Powder
  • 40 grams Sugar
  • 30 ml Essential Oil
  • Lemon Juice/Distilled Water/Rose Water

Natural Henna Powder

  • Body Art Quality – Triple (or more) shifted.
  • Ingredients – Contains 100% henna only, no added dye.
  • Colour – Khaki Green. If mix with water and green liquid is formed that indicated that coloring has been added and it is not pure powder.
  • Freshness – Manufactured recently. More recent manufactured are more fresh and yield better stain. Brown colour powder may be too old to give a good stain.
  • Smell – Smells grassy
  • Storage – Air tight, protected from light and moisture. If not using for long, air seal and store in freezer.

Sugar

  • Sugar is used to help henna paste stick better on skin. Sugar also helps to get a smooth silky paste.
  • Adding sugar helps the paste to crack less.
  • Sugar quantity is depending on humidity. More sugar on humid days and less on dry days.

Essential oil

  • Used as terps to help release dye in henna powder for darker stain.
  • Essential oil has to be 100% pure.
  • Essential oil that stain great is Lavender, Tea Tree, Eucalyptus and Cajeput.
  • For children and pregnant women only Lavender EO is used instead to prevent skin irritation.

Lemon Juice/ Water

  • Room Temperature with ph. 7.0 or less.
  • Acidic liquid like lemon juice releases stain much longer compare to water but the stains last longer on the skin.
  • Water (distilled or purified) releases stain faster but the stain does not last longer on the skin compare to acidic liquid.
  • For individual that are prone to skin allergies avoid using lemon juice as it is acidic and may cause skin irritation, instead use Rose Water.

How to make henna cones

Roll, fill & seal henna cones

To make henna cones you would need :
– Cellophane rolls
– Scissors
– Scotch Tape
– Pins
– Henna paste (filled in carrot bag)

ROLL

  1. Cut a cellophane roll into a rectangle with scissors. I prefer small to medium cones therefore 6″ by 4″ would be just nice. If you would like a bigger cone you can cut the cello bigger.
  2. Then hold the cello in the middle and by using your pointer finger and thumb. Roll the cello into a cone shape creating a funnel with a small tiny hole for paste to come out. You can also insert a small sized pin at the tip of the cone for much fine work.
  3. Tape the cone at the end to seal. Add another tape at the top end to secure the cone.

FILL

  • Fill the henna cones with henna paste from the carrot bag. If you are using pin remove the pin to allow the paste to be pushed down while filling.
  • Make sure to fill it 1/2 or 2/3 of the cone, do not fill the cone full with paste as you would need to seal the cone later.

SEal

  • To seal the henna cone, fold the top of the cone twice. Insert the pin back and seal the cone with scotch tape from top and the side. Viola the cones are ready to be used.

Keep henna cones in freezer if not using immediately. Cones can be stored up to 2 months in freezer. 20 minutes before using, just remove the cones from freezer to defrost.

Ultimate Mehendi Ceremony Guide for Brides.

Planning your big day ? Here are some tips for brides to get ready for their mehendi/henna ceremony. What you need to know before, during and after your henna session.

1 – Planning for Henna Session

  • Firstly fix a date, get your henna ceremony scheduled 2 to 3 day before your wedding. This is because natural henna stain takes 36 to 48 hours to mature and darken. Often brides fix their mehendi ceremony a day before the wedding, as brides are scared that the colour of their henna will not last that long till their wedding day. Natural henna typically last from 1 to 2 weeks, depending on the rate of the skin exfoliation.
  • Make sure to keep at least half a day or full day for your session as it may takes several hours to get henna done (depending on the length of henna chosen).
  • Avoid doing henna during the ceremony instead start it early before the guest starts pouring in so you wont be disturb by all the hugging, chats and get distracted. This also helps the henna artist to focus on their work fast when the brides is calm and not moving a lot.
  • Get a comfortable attire for your ceremony, something easy to move around, go to washroom or even change later. Remember you have to keep the paste on your hands for at least a min of 6 hours to get the desired stain.
  • When booking a henna artist, make sure to check their portfolio, reviews and compare their work of art. Beware of scammer ! Don’t get cheated, you don’t wanna be ruining your day. If you are unsure of the henna artist get a trial session scheduled.
  • Be sure that your henna artist are using only 100% natural henna without any added dye/chemicals. Some artist are not genuine in their service and is found to be adding unsafe chemical to get a dark stain without much afford by brides for the aftercare. You don’t wanna be running to the ER.
  • Make sure to have a comfortable space for both you and your henna artist to work with. Speak to your henna artist for their preferences.
  • Read the instruction given by your artist thoroughly and consult your henna artist for the design you wish to have ahead.
  • Don’t forget to get someone to help you with snacks/drink while getting your henna done. p/s – what are bridesmaids for ?

2- Before Henna

  • Get you manicure, pedicure, spa, shave, waxing and other skin exfoliation activities done at least 2 to 3 days before to remove any dead skin layers. Never do it after getting your henna done as it will shed the top most skin layer that has been henna-ed faster. This is also make the stain to not last long.
  • Have enough sleep the night before to avoid dozing off while getting your henna done. You don’t wanna ruin your design and make things go slower for your henna artist while you keep dozing off.
  • Shower and make sure to wear comfortable clothes before your session You gonna be sitting down for couples of hours so be comfortable.
  • Remember to not apply any oil or lotion on your skin prior henna. Its very important to keep skin clean to allow henna stain on your skin.
  • Don’t forget to tie you hair neatly so it will not disturb you later and try not to drink too much water at least 1 hour prior henna. It will be very difficult to go to the washroom with your henna on.

3- During Henna

  • Don’t sit under AC directly, sit in a warmer spot. Henna loves warm.
  • Be comfortable while seating, add pillows if needed. Fix a spot avoid changing spot in between session.
  • Get a private room away from guest if you are having guest in during your henna session. This is so that you can finish on time without disturbance.
  • Avoid moving a lot while getting your henna done as it may ruin the design.
  • Get your videographer/photographer to do henna only once your henna has dried. It will smudge your henna if the outdoor session is done in between of the henna session.

4- After Henna

  • Keep henna as long as possible, the longer the henna is kept the deeper it stain and the longer the stain lasts. Min of 6 hours is recommended for bridal henna.
  • Do not wash your henna, instead scrape your henna off using the back of a butter knife/spoon. You may use natural oil (coconut, olive or baby oil) to remove stubborn henna paste.
  • Avoid water for at least 6 hour after paste removal. Use henna balm to act as a barrier to your skin when coming in contact with water.
  • When keeping henna overnight, do not wrap your henna in plastic or sling wrap instead use a toilet tissue roll and a sock to avoid getting sweaty. Sweat will smudge the design.
  • Heat up some clove on pan and put your hands over the clove fumes to keep warm. If you re having socks on , you may use a heat pad and apply on the sock to keep warm. Remember heat helps to intensify the stain.

Promotional Henna Video

Behind the scene of doing Helga Violinist henna for her music video. I had a great opportunity to work along with Helga the musician and Sabreen Makeup Artist. We had so much fun working along to create the look and behind the scene of transformation for Helga’s youtube music video. Video by @dtonydrums.

Behind the scene : Henna Art

Music Video : Mahaganapathim

Watch “红血球会爆裂?这种体质不能画Henna” on YouTube

Last year Harin Hennagraphy was invited by Sin Chew Daily Press to give a talk on natural henna for their Pocketimes show.

I am so glad to be given this opportunity for giving awareness and sharing the knowledge on natural henna. It is very important to know the difference of Natural and “Chemical/instant henna”. I will be sharing more information on the difference soon. Stay tuned.